Selection Tool Overview & Terminology
Some of the most important features of Adobe Photoshop are the selection tools. When we talk about the selection tools, we are talking about a group of tools that do the same job in different ways. These exercises are going to help walk you through ALL of the different ways to make selections. Included with the descriptions are terms, links and resources... make sure you follow up on all of the material provided in this section. Not only will you be quizzed on the actual terminology used here, but every assignment after this will utilize these selection tools, and your success (and grades) for these assignments will be heavily based on your execution of these tools and techniques. Make sure you review the terminology section at the end of each exercise and follow the links in order to learn more about the tools... that will be the material you will be quizzed on.
Basic Selection Tools
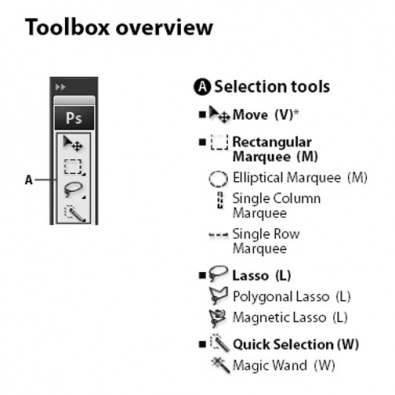
Move Tool
The Move tool moves layers, selections and guides.
Marquee Tools
The marquee tools make rectangular, elliptical, single row, and single column selections. You are only going to find that you use the rectangular and elliptical selection tools the most.
Lasso Tools
The lasso tools make freehand, polygonal (straight-edged), and magnetic (snap-to) selections.
Magic Wand Tool
The Magic Wand tool selects based on color. The magic wand will make a selection based on similarly colored areas.
Quick Selection Tool
The Quick Selection tool lets you quickly “paint” a selection using an adjustable round brush tip. This might sound confusing, but once you see how this works, it can be really useful for making some selections.
Selection Tool Exercises
This is the image that you will be using for all of the exercises. You will receive this image through Syncronize, or from me on a flash drive. When you are done with each exercise, you will save the exercise with a specific file name, with an Adobe Acrobat (PDF) file format. When you are done with all of the exercises, there will be instructions on how to combine the files into a PDF presentation… you will be sending me this presentation to be graded.
When You Are Finished...
When your’re done, open up ADOBE ACROBAT.
1. Click on COMBINE FILES.
2. On the left hand side, select again, COMBINE FILES (its pretty small)
3. At the top of your screen, you will see a row of options… select ADD FILES.
4. A pretty standard Dialogue box will open. Find your 5 files that you have completed… MAKE SURE THEY ARE THE .JPG FILES. If you hold down CTRL while clicking on the file names, you can select more than one at a time.
5. Once you have all 5 there, click NEXT… to continue, click CREATE. It will do its thing, combining all of the files into one document with multiple pages. When its done, choose SAVE.
6. Save the file as YOUR LAST NAME_SELECTION TOOL. This is what you will be sending me. Make sure that the exercises are IN THE ORDER THAT YOU DID THEM. If you need to rearrange them, click on the icon on the left hand side of the screen that looks like 2 pages overlapping. You will see a scroll of all of the pages. You can simply click and drag to reorder. If you do have to make changes, make sure you save these before sending.
